สารบัญ:
- ผู้เขียน John Day [email protected].
- Public 2024-01-30 13:03.
- แก้ไขล่าสุด 2025-01-23 15:12.

เยี่ยมชมเว็บไซต์ Techtronic Harsh:
ทุกที่ที่มีการระบาดใหญ่ของไวรัสโคโรน่าสายพันธุ์ใหม่ (COVID19) จำเป็นต้องจับตาดูสถานการณ์ปัจจุบันของ COVID-19 ในโลก
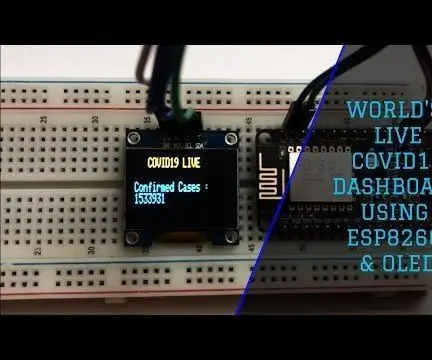
เมื่ออยู่ที่บ้าน นี่คือโครงการที่ฉันนึกถึง "World's Live Covid19 Dashboard" - แดชบอร์ดที่ให้ข้อมูลอัปเดตแบบเรียลไทม์เกี่ยวกับสถานะโลกของ COVID-19 ไม่จำเป็นต้องเปิดทีวีหรือดูต่อที่เว็บไซต์ต่างๆ อีกต่อไป
การออกแบบโครงการไม่ใช่ส่วนสำคัญ แต่การสร้างสิ่งที่มีประโยชน์โดยใช้ส่วนประกอบที่สะดวกคือความท้าทาย โปรเจ็กต์นี้จะช่วยคุณสร้างอินเทอร์เฟซแดชบอร์ดที่เรียบง่ายเพื่อให้คุณอัปเดตอยู่เสมอ
เสบียง
- ESP8266
- จอแสดงผล OLED
- สายจัมเปอร์
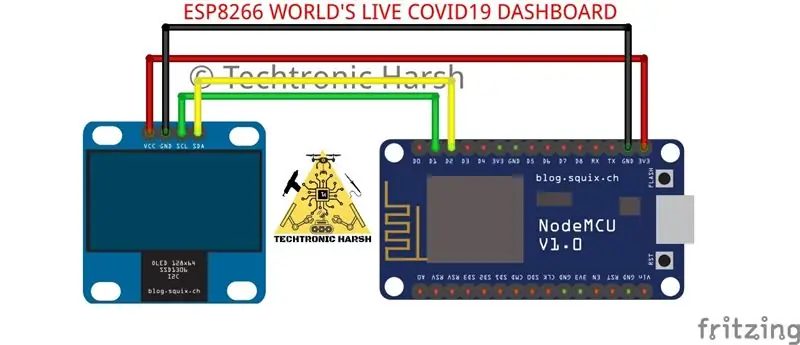
ขั้นตอนที่ 1: แผนผัง:
ขั้นตอนที่ 2: การตั้งค่า:
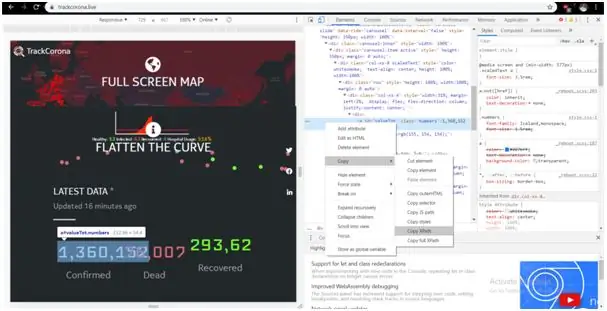

- เยี่ยมชมเว็บไซต์ของ Realtime Covid19 Dashboard ฉันกำลังใช้
-
เข้าสู่ระบบ/ลงทะเบียนที่ https://thingspeak.com ไปที่ App และสร้าง ThingHttp Action ใหม่
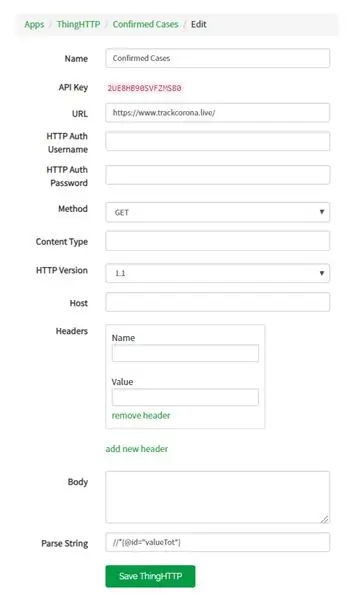
- ระบุชื่อที่คุณเลือก, URL (https://trackcorona.live), เมธอดเป็น GET และใน Parse String คุณต้องวาง XPath จากเว็บไซต์ trackcorna.live ของฟิลด์ที่จำเป็นที่คุณต้องแสดง
-
ในตัวอย่างด้านบน (รูปภาพ) ฉันกำลังแยกสตริงสำหรับกรณีที่ได้รับการยืนยัน สิ่งที่คุณต้องทำคือ
- คลิกขวาที่จำนวนเคสที่ยืนยัน > ตรวจสอบ
- คลิกขวาอีกครั้งในรหัส > คัดลอก > CopyXPath
- วางสิ่งนี้ในฟิลด์ Parse String ของ ThinkHttp Action และบันทึก
- ในทำนองเดียวกัน ทำเช่นนี้สำหรับการกู้คืน ความตาย อัตราการเสียชีวิต และอัตราการเสียชีวิตทั้งหมด
- ไปที่ซอร์สโค้ดและแทนที่ SSID ด้วยชื่อ Wifi ของคุณ รหัสผ่านด้วยรหัสผ่าน Wifi ของคุณและคีย์ API ด้วย ThingHttp API ของคุณ
- อัปโหลดรหัส แค่นั้นแหละ!!
ขั้นตอนที่ 3: รหัสที่มา:
/* © Techtronic Harsh
Youtube:
Instructables: https://www.instructables.com/member/… Instagram: https://instagram.com/techtronicharsh Website: https://techtronicharsh.com Telegram:
*/
#include //ใช้ฟังก์ชัน ESP8266 #include #include #include #include #include
Adafruit_SSD1306 display = Adafruit_SSD1306(128, 32, &Wire);
const char* ssid = "*******"; // SSID เราเตอร์ของคุณ เช่น ชื่อ WiFi const char* password = "*******"; //รหัสผ่าน WiFi ของคุณ const char* host = "api.thingspeak.com"; //เราอ่านข้อมูลจากโฮสต์นี้ const int httpPortRead = 80; /* เพียงแค่เปลี่ยนคีย์ API ด้วย API ของคุณผ่าน ThingHttp */ const char* url1 = "/apps/thinghttp/send_request?api_key=TGC4KNQ98REOA4JH"; //ยืนยัน const char* url2 = "/apps/thinghttp/send_request?api_key=Y0ALN1QGDTNLLNNM"; //กู้คืน const char* url3 = "/apps/thinghttp/send_request?api_key=0J24MB3W9F9Q0E7M"; //death const char* url4 = "/apps/thinghttp/send_request?api_key=R2BKR1DRVS5YT2PH"; //อัตราการกู้คืน const char* url5 = "/apps/thinghttp/send_request?api_key=VYMVMGK9S8W21EXQ"; //อัตราการเสียชีวิต
คดีสตริง, ความตาย, การกู้คืน, อัตราการฟื้นตัว, อัตราการตาย;
ไคลเอนต์ WiFiClient; //สร้างไคลเอนต์ WiFi และไคลเอนต์
HTTPClient
การตั้งค่าเป็นโมฆะ () {
Serial.begin(9600); //เริ่มการสื่อสารแบบอนุกรม WiFi.disconnect(); // ตัดการเชื่อมต่อและเชื่อมต่อกับ Wifi อีกครั้งที่คุณตั้งไว้ล่าช้า (1000); WiFi.begin(ssid, รหัสผ่าน); Serial.println("เชื่อมต่อกับเครือข่าย WiFi แล้ว"); //แสดงข้อเสนอแนะบนจอภาพอนุกรม Serial.println(WiFi.localIP()); display.begin(); display.display(); ล่าช้า (1000);
display.clearDisplay();
display.display();
display.setTextSize(1);
display.setTextColor(สีขาว);
}
วงเป็นโมฆะ ()
{ // การอ่าน 1: การอ่านคดีที่ได้รับการยืนยัน
if(http.begin(host, httpPortRead, url1)) //เชื่อมต่อกับโฮสต์และ url
{ int httpCode = http. GET(); // ตรวจสอบข้อเสนอแนะหากมีการตอบสนองหาก (httpCode > 0) { if (httpCode == HTTP_CODE_OK || httpCode == HTTP_CODE_MOVED_PERMANENTLY) { กรณี = http.getString(); Serial.print("กรณียืนยัน: "); Serial.println (กรณี); display.setCursor(0, 0); display.println(" COVID19 LIVE"); display.println(""); display.println("กรณียืนยัน: "); display.println (กรณี); display.display(); ล่าช้า(4000); display.clearDisplay(); } } else // หากเราไม่สามารถรับข้อมูลได้ { Serial.printf("[HTTP] GET… ล้มเหลว ข้อผิดพลาด: %s\n", http.errorToString(httpCode).c_str()); } http.end(); } else //หากเราไม่สามารถเชื่อมต่อกับ HTTP { Serial.printf("[HTTP} Unable to connect\n"); }
// กำลังอ่าน 2: การอ่านการกู้คืน
if(http.begin(host, httpPortRead, url2))
{ int httpCode = http. GET(); if (httpCode > 0) { if (httpCode == HTTP_CODE_OK || httpCode == HTTP_CODE_MOVED_PERMANENTLY) { กู้คืน = http.getString(); Serial.print("กู้คืน: "); Serial.println (กู้คืน); display.setCursor(0, 0); display.println(" COVID19 LIVE"); display.println(""); display.println("กู้คืนแล้ว: "); display.println (กู้คืน); display.display(); ล่าช้า(4000); display.clearDisplay(); } } อื่น { Serial.printf("[HTTP] GET… ล้มเหลว ข้อผิดพลาด: %s\n", http.errorToString(httpCode).c_str()); } http.end(); } อื่น ๆ { Serial.printf("[HTTP} ไม่สามารถเชื่อมต่อ\n"); }
// การอ่าน 3: การอ่านความตาย
if(http.begin(host, httpPortRead, url3))
{ int httpCode = http. GET(); if (httpCode > 0) { if (httpCode == HTTP_CODE_OK || httpCode == HTTP_CODE_MOVED_PERMANENTLY) { ความตาย = http.getString(); Serial.print("เสียชีวิต: "); Serial.println (ความตาย); display.setCursor(0, 0); display.println(" COVID19 LIVE"); display.println(""); display.println("ความตาย: "); display.println(ความตาย); display.display(); ล่าช้า(4000); display.clearDisplay(); } } อื่น { Serial.printf("[HTTP] GET… ล้มเหลว ข้อผิดพลาด: %s\n", http.errorToString(httpCode).c_str()); } http.end(); } อื่น ๆ { Serial.printf("[HTTP} ไม่สามารถเชื่อมต่อ\n"); }
// การอ่าน 4: การอ่านอัตราการฟื้นตัว
if(http.begin(host, httpPortRead, url4))
{ int httpCode = http. GET(); if (httpCode > 0) { if (httpCode == HTTP_CODE_OK || httpCode == HTTP_CODE_MOVED_PERMANENTLY) { อัตราการกู้คืน = http.getString(); Serial.print("อัตราการกู้คืน: "); Serial.println (อัตราการกู้คืน); display.setCursor(0, 0); display.println(" COVID19 LIVE"); display.println(""); display.println("อัตราการกู้คืน: "); display.print(อัตราการกู้คืน); display.println(" % "); display.display(); ล่าช้า(4000); display.clearDisplay(); } } อื่น { Serial.printf("[HTTP] GET… ล้มเหลว ข้อผิดพลาด: %s\n", http.errorToString(httpCode).c_str()); } http.end(); } อื่น ๆ { Serial.printf("[HTTP} ไม่สามารถเชื่อมต่อ\n"); }
// การอ่าน 5: การอ่านอัตราการตาย
if(http.begin(host, httpPortRead, url5))
{ int httpCode = http. GET(); if (httpCode > 0) { if (httpCode == HTTP_CODE_OK || httpCode == HTTP_CODE_MOVED_PERMANENTLY) { Deathrate = http.getString(); Serial.print("อัตราการเสียชีวิต: "); Serial.println (มรณกรรม); display.setCursor(0, 0); display.println(" COVID19 LIVE"); display.println(""); display.println("อัตราการเสียชีวิต: "); display.print(มรณกรรม); display.println(" % "); display.display(); ล่าช้า(4000); display.clearDisplay(); display.display(); } } อื่น { Serial.printf("[HTTP] GET… ล้มเหลว ข้อผิดพลาด: %s\n", http.errorToString(httpCode).c_str()); } http.end(); } อื่น ๆ { Serial.printf("[HTTP} ไม่สามารถเชื่อมต่อ\n"); } while (WiFi.status() != WL_CONNECTED) //ในกรณีที่การเชื่อมต่อ Wifi ขาดหาย { WiFi.disconnect(); ล่าช้า (1000); WiFi.begin(ssid, รหัสผ่าน); Serial.println("กำลังเชื่อมต่อกับ WiFi อีกครั้ง.."); display.setCursor(0, 0); display.println("Techtronic Harsh"); display.println(""); display.println(" กำลังเชื่อมต่อ…. "); display.display(); ล่าช้า (10000); display.clearDisplay(); display.display(); }
}
/* © Techtronic Harsh
Youtube:
Instructables: https://www.instructables.com/member/… Instagram: https://instagram.com/techtronicarsh Website: https://techtronicharsh.com Telegram:
*/
ขั้นตอนที่ 4: การทำงาน:

ทำการเชื่อมต่อตามแผนภาพวงจรและอัปโหลดรหัสหลังจากเลือกบอร์ดและพอร์ต COM ที่เหมาะสม หากแสดงข้อผิดพลาด ตรวจสอบให้แน่ใจว่าคุณได้เพิ่มไลบรารี่ตามคำแนะนำที่ให้ไว้ด้านบน
หากต้องใช้เวลามากในการทำงานบน OLED ตรวจสอบให้แน่ใจว่าคุณได้เชื่อมต่อกับบริการอินเทอร์เน็ตเช่น WiFi หรือ Hotspot ของคุณอย่างเหมาะสม
แนะนำ:
ติดตาม: ศูนย์สื่อขั้นสูงพร้อม Odroid N2 และ Kodi (รองรับ 4k และ HEVC): 3 ขั้นตอน
ติดตาม: Advanced Media Center พร้อม Odroid N2 และ Kodi (รองรับ 4k และ HEVC): บทความนี้เป็นบทความต่อจากบทความก่อนหน้าของฉันที่ประสบความสำเร็จค่อนข้างมากเกี่ยวกับการสร้างศูนย์สื่ออเนกประสงค์ โดยอ้างอิงจาก Raspberry PI ที่ได้รับความนิยมมากในตอนแรก แต่ ในภายหลัง เนื่องจากไม่มีเอาต์พุตที่สอดคล้องกับ HEVC, H.265 และ HDMI 2.2 จึงมีสวิตช์
โปรแกรม MicroPython: อัปเดตข้อมูลโรค Coronavirus (COVID-19) แบบเรียลไทม์: 10 ขั้นตอน (พร้อมรูปภาพ)
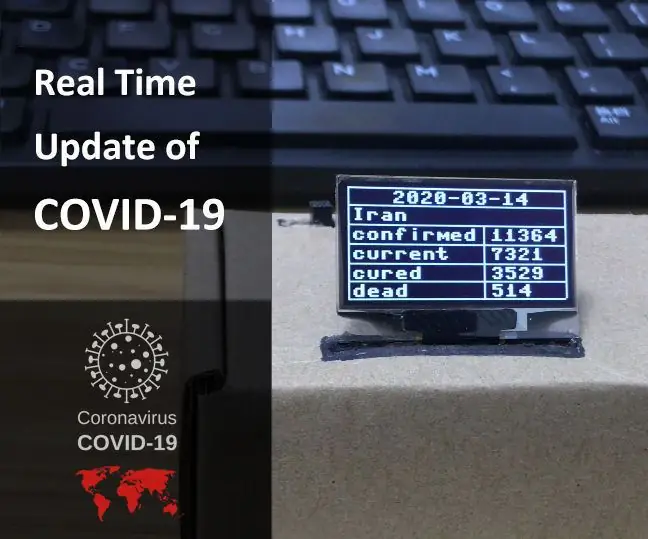
โปรแกรม MicroPython: อัปเดตข้อมูลโรคโคโรนาไวรัส (COVID-19) แบบเรียลไทม์: ในช่วงไม่กี่สัปดาห์ที่ผ่านมา จำนวนผู้ป่วยที่ได้รับการยืนยันว่าเป็นโรค coronavirus (COVID 19) ทั่วโลกเกิน 100,000 รายและองค์การอนามัยโลก (WHO) ได้ประกาศ การระบาดของโรคปอดบวม coronavirus ใหม่จะเป็นการแพร่ระบาดทั่วโลก ฉันเป็นอย่างมาก
Giant LED - ติดตาม Adam Savage: 13 ขั้นตอน (พร้อมรูปภาพ)
Giant LED - การติดตาม Adam Savage: ที่นี่คุณจะได้พบกับการแสดงของ Giant LED ซึ่งมีวัตถุประสงค์ใหม่เพื่อทำหน้าที่เป็นไฟเตือน Twitter, YouTube และ Twitch จุดประสงค์หลักสำหรับฉันคือการเตือนเมื่อมีทวีต วิดีโอ หรือสตรีมที่กระตุกโดย Adam Savage และทีมทดสอบ และเพื่อ
การติดตาม GPS แบบเรียลไทม์: 3 ขั้นตอน
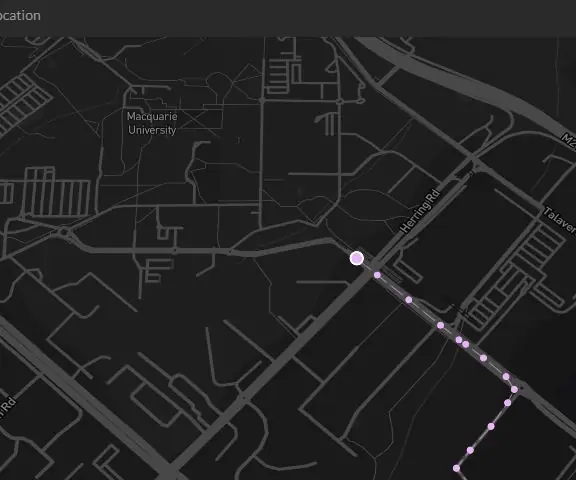
การติดตาม GPS แบบเรียลไทม์: ในบทช่วยสอนนี้ เราจะแสดงวิธีการติดตามตำแหน่งแบบเรียลไทม์โดยใช้ BerryGPS-GSM, Raspberry Pi Zero และสถานะเริ่มต้น เราจะส่งลองจิจูด ละติจูด และความเร็วผ่าน 3G ด้วย BerryGPS-GSM ไปยัง Initial State
ESP01 Moodlight พร้อม Firebase แบบเรียลไทม์ + OTA: 7 ขั้นตอน
ESP01 Moodlight พร้อม Firebase แบบเรียลไทม์ + OTA: รองรับโหมด RGB และเอฟเฟกต์จาง นอกจากนี้ยังมีการรองรับการควบคุมความสว่าง รองรับการอัปเดต OTA
